Build a Reliable DIY Pallet Shed with These Simple Plans for Beginners

Build a Reliable DIY Pallet Shed with These Simple Plans for Beginners

Build Your Dream Pallet Shed: A Beginner's Guide

Hey there, fellow DIY enthusiasts! So you're thinking about building a shed, but the prices at the home improvement store are making your eyes water? Don't worry, you're not alone! That's why I'm here to share my secrets on building a super reliable, surprisingly stylish, and totally affordable pallet shed. This guide is perfect for beginners â€" no fancy tools or years of experience needed! Let's get started!

Step 1: Gathering Your Materials â€" The Pallet Hunt Begins!

The beauty of a pallet shed lies in its resourcefulness. The star of the show? Pallets! Now, before you start picturing yourself scavenging behind supermarkets at midnight (although, that could be fun!), let's talk strategy.

Finding Your Perfect Pallets

*
  • Local Businesses: Many businesses regularly replace pallets, and they're often happy to give them away for free. Think grocery stores, hardware stores, and even breweries. Just ask nicely!
  • *
  • Craigslist/Facebook Marketplace: You can often find people giving away pallets or selling them for a steal.
  • *
  • Construction Sites (with permission): If you know someone working on a construction project, ask if you can have some of their discarded pallets. Always get permission first!
  • Choosing the Right Pallets

    Not all pallets are created equal. Look for: *
  • Heat-treated pallets: These are marked with an "HT" stamp and are safer to use than chemically treated ones (which are often marked with "MB").
  • *
  • Pallets in good condition: Avoid pallets with significant rot, damage, or loose boards. You want your shed to last!
  • *
  • Consistent size: Try to find pallets of a similar size and type to make construction easier.
  • Aim for at least 10-15 pallets, depending on the size of the shed you envision. It's better to have a few extra than to run short in the middle of the project.

    Step 2: Preparing Your Pallets â€" A Little TLC Goes a Long Way

    Before you start building, your pallets need a little prep work.

    Cleaning and Repairing

    Give your pallets a good cleaning. Use a stiff brush, a pressure washer (if you have one), and some soap to remove dirt, debris, and any lingering grime. Repair any damaged boards using wood glue and screws. Replace severely damaged boards if necessary.

    Disassembling (Optional but Recommended)

    While you *can* build your shed directly with the pallets intact, disassembling them offers several advantages: It allows for more precise construction and gives you greater flexibility in designing your shed. Plus, it makes it easier to address any damaged sections.

    Step 3: Building the Foundation â€" A Solid Base for Your Masterpiece

    Your shed needs a sturdy foundation. This could be as simple as a concrete slab (if you're feeling ambitious!), or a more budget-friendly option like a gravel base. For this beginner's guide, we'll go with a gravel base.

    Creating the Gravel Base

    1. Clear the area where you want to build your shed. Remove any grass, weeds, or debris.
    2. Level the ground as much as possible. A slightly uneven surface is okay, but major dips or bumps need to be addressed.
    3. Lay down a layer of landscaping fabric to prevent weeds from growing up through the gravel.
    4. Spread a 4-6 inch layer of gravel over the fabric. Compact it down using a tamper or even just your feet.

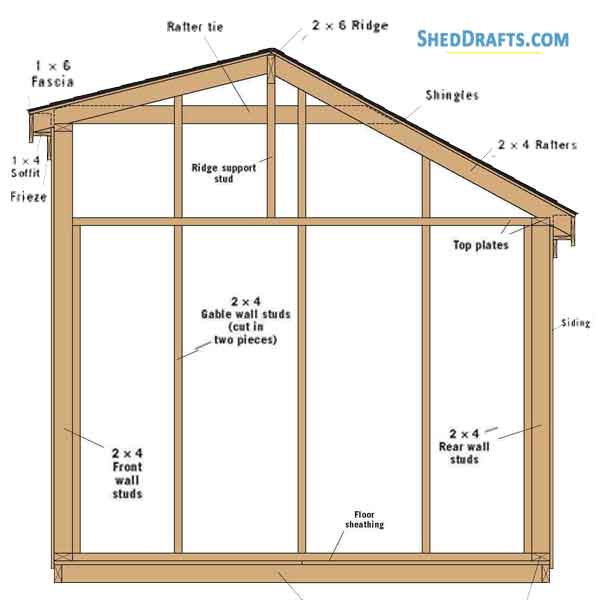
    Step 4: Assembling the Walls â€" Putting it All Together

    Now comes the fun part! This is where you'll use your prepared pallets to construct the walls of your shed. Remember, you have the option of using whole pallets or individual boards. If you're using whole pallets, ensure they're securely fastened together.

    Wall Construction Tips

    *
  • Use screws: Nails might pull out over time, so screws provide a much more secure fastening.
  • *
  • Reinforce corners: Use extra bracing to strengthen the corners of your shed.
  • *
  • Leave space for a door: Plan where your door will go before you assemble the walls.
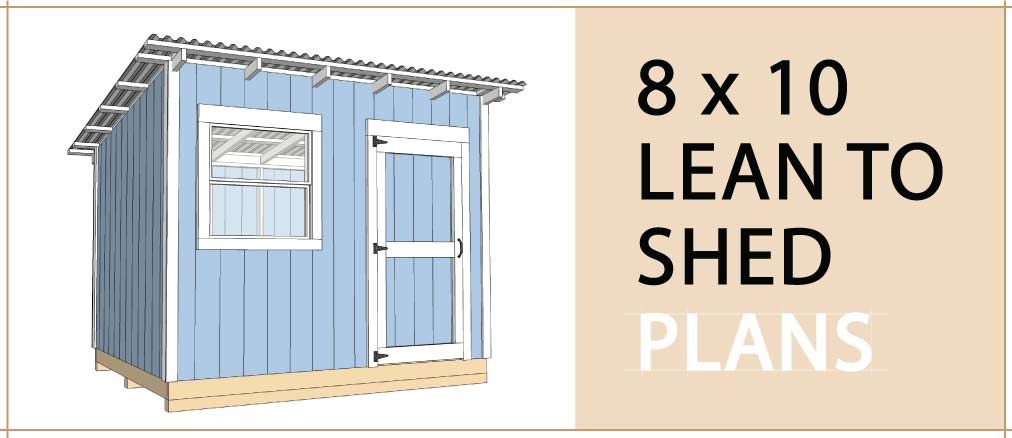
  • Step 5: Building the Roof â€" Shelter from the Storm

    For a simple roof, consider a lean-to style or a gable roof (two slanted sides meeting at a peak). You can use plywood, corrugated metal sheets, or even more pallets for the roofing material. Remember to waterproof your roof.

    Step 6: Adding the Finishing Touches â€" Personalization Time!

    Once your shed is structurally sound, it's time for the fun stuff! Add a door, windows, shelvesâ€"whatever you need to personalize your space. Consider painting your shed for extra protection and aesthetics. A coat of stain can also add a rustic charm.

    Frequently Asked Questions

    Q: How long does it take to build a pallet shed?

    A: This depends on the size and complexity of your shed, as well as your experience level. A simple shed could take a weekend, while a more elaborate one might take several weekends.

    Q: Do I need special tools?

    A: While a basic toolkit will suffice, power tools like a drill and a saw will significantly speed up the process. A level is essential for ensuring straight walls.

    Q: How do I make my pallet shed weatherproof?

    A: Use weatherproof sealant on the wood, a waterproof roofing material, and consider adding gutters and downspouts to direct rainwater away from the shed.

    Q: Can I use treated pallets?

    A: While you can, it's generally recommended to avoid chemically treated pallets ("MB" stamp) due to potential health concerns. Heat-treated pallets ("HT" stamp) are the safer option.

    Q: What can I store in my pallet shed?

    A: This depends on the size and sturdiness of your shed! You can store garden tools, outdoor equipment, bicycles, wood, or even use it as a small workshop.

    There you have it! Building a pallet shed is a rewarding project that combines creativity, resourcefulness, and a whole lot of fun. Remember to take your time, follow safety precautions, and most importantly, have fun! Happy building!
    Share:

    How to Create a Pallet Shed DIY for Your Outdoor Space

    How to Create a Pallet Shed DIY for Your Outdoor Space

    Build Your Dream Pallet Shed: A DIY Guide

    Tired of cluttered outdoor spaces? Yearning for a stylish and functional storage solution that won't break the bank? Then look no further! This comprehensive guide will walk you through building your own charming pallet shed, transforming your backyard from chaotic to organized in no time. Forget expensive pre-fabricated sheds; reclaim and repurpose with this eco-friendly and budget-friendly DIY project.

    Planning Your Pallet Paradise: Preparation is Key

    Before you dive into hammering and sawing, meticulous planning ensures a smooth and successful build. Begin by determining the ideal location for your shed. Consider factors like sunlight, proximity to power sources (if needed for interior lighting or electric tools), and accessibility for easy loading and unloading. Next, sketch out your shed's dimensions. Consider your storage needs â€" will you house gardening tools, lawn equipment, or something else entirely? This dictates the required size. Finally, source your pallets. Look for sturdy, heat-treated pallets in good condition, free from rot or significant damage. Inspect each carefully and prioritize those with minimal gaps between the planks.

    Gathering Your Materials and Tools

    Once your plans are finalized, gather the necessary supplies. You'll need a substantial number of pallets, depending on your shed's size and design. In addition to pallets, acquire strong screws, a drill with various drill bits (including a wood drill bit), a hammer, measuring tape, safety glasses, work gloves, a level, a saw (circular saw recommended), and possibly a post-hole digger or concrete for a more permanent foundation (depending on your chosen foundation type). If you plan on adding a roof, consider roofing felt, plywood, or corrugated metal sheeting.

    Construction: Building Your Pallet Fortress

    With your materials assembled and plans in hand, it's time to construct the shed's frame. Begin by creating a solid base. You can opt for a simple, level ground base by laying down gravel or paving stones, or construct a more permanent foundation using concrete footings for added stability. Securely fasten your pallets together to form the walls, ensuring they are plumb and level. Use the screws to join the pallets, creating a strong and stable structure. Pay close attention to detail to ensure the walls are square and stable.

    Roofing Your Creation

    The roof is the final, crucial touch. Construct a simple gable roof using more pallets or plywood, ensuring a sufficient overhang to protect the walls from the elements. Securely attach the roofing material of your choice â€" plywood provides a more solid roof, while corrugated metal offers durability and weather resistance. Seal any gaps to prevent leaks, and consider adding additional weatherproofing if necessary. Consider adding a door and windows to complete your shed.

    Finishing Touches: Personalize Your Pallet Shed

    Once the structure is complete, personalize your new pallet shed! Consider adding a coat of weather-resistant sealant or paint to enhance its lifespan and aesthetic appeal. You can paint it a vibrant color to complement your outdoor space or choose a natural stain to maintain a rustic charm. Add hinges and a latch to your door, and perhaps a window for added light and ventilation. This is your chance to truly make it your own.

    Maintenance and Care

    To ensure the longevity of your hard work, regular maintenance is key. Inspect your shed periodically for any signs of damage or deterioration, and promptly address any issues. Re-apply sealant or paint as needed, and keep the interior clean and organized. With proper care, your DIY pallet shed will provide years of reliable storage and add a unique touch to your outdoor space.

    Share:

    Step-by-Step Pallet Shed DIY: How to Build a Shed with Minimal Effort

    Step-by-Step Pallet Shed DIY: How to Build a Shed with Minimal Effort

    Step-by-Step Pallet Shed DIY: Constructing a Functional Storage Structure with Minimal Effort

    This comprehensive guide details the construction of a durable and aesthetically pleasing shed utilizing reclaimed pallets. While appearing deceptively simple, careful planning and execution are crucial for a structurally sound and long-lasting result. This process prioritizes ease of construction while maintaining a focus on quality and longevity.

    Phase 1: Planning and Preparation

    Before commencing any construction, meticulous planning is paramount. This phase involves assessing your needs, gathering materials, and preparing the site. Failing to adequately plan will inevitably lead to complications and potential project failure.

    1.1 Assessing Your Needs and Shed Specifications

    Determine the intended purpose of your pallet shed. Will it house gardening tools, store firewood, or serve as a general-purpose storage area? This will dictate the necessary size and features. Consider the dimensions (length, width, and height) carefully, factoring in the size of the pallets you intend to use and the items you'll be storing. Sketch a simple design, noting the placement of doors, windows (if desired), and any internal shelving.

    1.2 Sourcing and Evaluating Pallets

    The foundation of your shed rests on the quality of the pallets employed. Sourcing high-quality, sturdy pallets is crucial. Inspect each pallet thoroughly for damage, rot, loose nails, or pests. Prioritize pallets constructed from pressure-treated lumber, ensuring they meet the necessary standards for outdoor use. Determine the number of pallets needed based on your design, accounting for potential waste or imperfections.

    Note: Always obtain pallets from reputable sources and ensure they are free from harmful chemicals or treatments unsuitable for outdoor use. Contact your local lumberyard or recycling center for guidance on sourcing suitable pallets.

    1.3 Site Preparation and Foundation

    Select a level, well-drained location for your shed. Clear the area of any debris, vegetation, or rocks. The foundation is critical; a poorly prepared base will lead to instability. Choose from one of the following foundation options:

    • Concrete Slab: Offers the most stable and durable foundation. Requires professional installation or meticulous DIY execution.
    • Gravel Base: A cost-effective option. Requires compacting a layer of gravel to create a level and well-drained base.
    • Wooden Frame: Simpler to construct, but requires regular maintenance to prevent rot. A frame constructed from pressure-treated lumber provides added durability.

    Regardless of the foundation chosen, ensure it's level to guarantee the structural integrity of your shed.

    Phase 2: Construction

    This phase involves assembling the shed's framework and cladding using the prepared pallets. Follow these steps meticulously for a strong and aesthetically pleasing result.

    2.1 Framing the Base

    Construct a rectangular frame using pressure-treated lumber, matching the dimensions of your shed's base. This frame will provide a stable platform for the pallet walls. Securely fasten the frame members using galvanized screws or appropriate fasteners suitable for outdoor use. Ensure the frame is perfectly level and square.

    2.2 Erecting the Walls

    Position the pallets vertically to form the shed's walls. Securely attach the pallets to the base frame using long screws or bolts. Use appropriate shims to ensure perfectly vertical alignment. Consider interleaving pallets for added strength and stability. This may require cutting some pallets to fit snugly.

    2.3 Installing the Roof

    The roof design depends on personal preference and the angle desired for water runoff. A simple gable roof is recommended for its ease of construction and effectiveness. Construct a frame using pressure-treated lumber to support the roof structure, ensuring adequate slope. Attach plywood sheathing to the roof frame, followed by roofing felt or asphalt shingles for weather protection. Securely fasten all components to withstand wind and rain.

    2.4 Adding Doors and Windows (Optional)

    If your design includes doors and/or windows, this is the stage to integrate them. Carefully cut openings in the pallet walls to accommodate these features. Install pre-hung doors and windows or construct your own using reclaimed lumber. Ensure a tight seal to prevent drafts and water ingress. Weather stripping or caulking can enhance the seal’s effectiveness.

    Phase 3: Finishing Touches

    Once the main structure is complete, focus on refining the shed’s aesthetics and functionality.

    3.1 Exterior Finishing

    Consider applying a sealant or weatherproofing treatment to the exterior of the pallets. This will enhance the shed's longevity and protect the wood from the elements. Choose a product suitable for outdoor use and follow the manufacturer's instructions carefully.

    3.2 Interior Finishing

    Add shelving or other internal storage solutions based on your needs. If desired, paint or stain the interior of the shed to improve its appearance and protect the wood. Choose paint or stain formulated for outdoor use to ensure durability. Consider adding ventilation if needed.

    Phase 4: Final Inspection and Maintenance

    Before declaring the project complete, conduct a thorough inspection. Check for any loose components, gaps, or areas requiring further attention. Ensure the roof is watertight and the doors and windows (if applicable) are properly sealed. Regular maintenance will extend the life of your pallet shed. Regularly inspect for signs of damage or rot. Address any issues promptly to prevent further deterioration.

    By meticulously following these steps, you can construct a sturdy and functional pallet shed with minimal effort. Remember that safety should always be prioritized during construction. Wear appropriate safety gear, including eye protection and gloves. Take your time, and enjoy the process of creating a unique and practical addition to your property. Your newly built shed will provide years of dependable storage solutions.

    Share:

    DIY Pallet Shed Plans: Maximize Your Yard with Affordable Outdoor Storage

    DIY Pallet Shed Plans: Maximize Your Yard with Affordable Outdoor Storage

    DIY Pallet Shed Plans: Maximize Your Yard with Affordable Outdoor Storage

    Tired of clutter overwhelming your yard? Dreaming of a stylish and functional storage solution without breaking the bank? Then look no further! This guide provides comprehensive DIY pallet shed plans, empowering you to build a fantastic outdoor storage space using readily available and surprisingly affordable reclaimed pallets. Forget expensive pre-fabricated sheds; you'll be amazed at what you can achieve with a little effort and these detailed instructions.

    Planning Your Pallet Shed: Size and Location

    Before diving into construction, meticulously plan your pallet shed's dimensions and location. Consider the amount of storage space you need. Will it house gardening tools, outdoor furniture, or something else entirely? Measure the area you intend to use, ensuring sufficient clearance for doors and access. Optimal placement considers proximity to power sources (if needed for lighting or electric tools within the shed) and sunlight exposure â€" less sun exposure minimizes the likelihood of rapid pallet wood deterioration. Think about the aesthetic appeal too; where will the shed best complement your yard's existing landscape?

    Essential Measurements and Considerations

    Sketch a detailed plan, noting the dimensions of the base, walls, roof, and doors. Factor in the size of the pallets you'll be using â€" standard pallets vary slightly in dimensions. Account for the thickness of the pallet wood when calculating wall height and overall dimensions. Remember to consider building codes and any local regulations regarding shed construction. Check if permits are required before you start building. This seemingly small step will prevent headaches down the road.

    Gathering Your Materials and Tools

    Sourcing materials is crucial for a successful project. Your primary material is, of course, reclaimed pallets! Inspect them thoroughly for rot, damage, and loose nails before use. You'll need a substantial quantity, depending on your shed's size. Secure additional lumber for structural support, framing, roofing, and doors. Don't overlook essential hardware like screws, nails, hinges, and a latch. Protective treatments for wood will extend the life of your shed, and the right toolsâ€"a hammer, saw, drill, screwdriver, level, and measuring tapeâ€"are essential for accurate construction.

    Material Checklist

    • Reclaimed pallets (quantity depends on shed size)
    • Lumber for framing and support
    • Roofing material (e.g., corrugated metal, asphalt shingles)
    • Screws, nails, hinges, latch
    • Wood preservative/sealer
    • Hammer, saw, drill, screwdriver, level, measuring tape

    Step-by-Step Construction Guide

    Building your pallet shed involves several key steps. Begin by constructing a sturdy base, either directly on the ground using concrete blocks for leveling or building a wooden frame platform above ground. This ensures stability and prevents ground moisture from damaging the pallets. Next, erect the walls, carefully securing the pallets vertically using screws and additional lumber for reinforcement. Pay close attention to aligning the pallets for a neat and strong structure. Construct the roof frame, ensuring sufficient pitch for water runoff, then cover it with your chosen roofing material. Finally, install the door and any windows, adding a finishing touch with wood preservative for weather protection.

    Tips for Success

    Safety First: Always prioritize safety. Wear appropriate safety gear, including gloves and eye protection. Pre-treat the wood: Protect your investment by treating the pallets with a wood preservative before assembly to prevent rot and pest infestation. Build in stages: Don't rush the process. Take your time to ensure each step is done correctly, building a solid foundation for a long-lasting structure. Consider aesthetics: Enhance your shed's appearance with a fresh coat of paint or stain to match your yard’s style. You've created a functional and visually appealing addition to your outdoor space.

    By following these detailed plans, you'll successfully build a stylish and functional pallet shed, maximizing your yard space and providing valuable outdoor storageâ€"all at a fraction of the cost of a commercially-built shed. Enjoy the satisfaction of a job well done and the convenience of your new storage solution!

    Share:

    DIY Wood Pallet Shed: A Smart, Affordable Way to Build Your Shed

    DIY Wood Pallet Shed: A Smart, Affordable Way to Build Your Shed

    DIY Wood Pallet Shed: A Smart, Affordable Way to Build Your Shed

    Hey there, fellow DIY enthusiasts! So you're dreaming of a new shed, but the price tags at the home improvement stores are making your wallet weep? Don't despair! You can totally build your own awesome shed â€" and save a ton of money â€" using reclaimed wood pallets. It's a fantastic project that's surprisingly easier than you might think. Let's dive into how you can build your own pallet shed!

    Planning Your Pallet Shed Project

    Before you even think about grabbing a hammer, some serious planning is key. This will save you headaches (and potentially wasted materials) down the line.

    Choosing the Right Location

    First things first: where will your glorious new shed reside? You'll need to consider things like: sun exposure (do you need shade or sun?), access to utilities (electricity? Water?), and local regulations (check your HOA or building codes). You'll also want a reasonably level spot with good drainage to avoid soggy floors.

    Determining Size and Design

    How big of a shed do you actually need? Think about what you plan to store. A small shed for garden tools is vastly different from one for storing lawnmowers and bikes! Sketch out a basic design â€" even a rough drawing is helpful. Consider things like door placement, window placement (if any), and overall aesthetic. Will it be a simple rectangular shed or something more elaborate?

    Gathering Your Materials: The Pallet Hunt!

    This is where the fun (and the free-ish part) begins! Sourcing pallets is the heart of this project. Check with local businesses â€" restaurants, construction sites, and even grocery stores â€" they often have pallets they're happy to get rid of. Just be sure to check the condition of the pallets before you commit. You want pallets that are sturdy, relatively clean, and free of rot or significant damage.

    Beyond pallets, you'll need:

    • Tools: Hammer, saw (circular saw is best but a hand saw will work), screwdriver, measuring tape, level, drill, safety glasses, work gloves.
    • Fasteners: Plenty of screws (various sizes for different applications), nails (optional, but can be handy), possibly some galvanized metal brackets for added strength.
    • Other Materials: Plywood or OSB for flooring and roofing (unless you're incredibly ambitious and want to use pallet wood entirely!), roofing felt or shingles, weatherproof paint or sealant, hinges for the door, a door handle, and any extra wood for supports and framing as needed.

    Building Your Pallet Shed: Step-by-Step

    Alright, let's get our hands dirty! This is a general outline; the specifics will depend on your design and the pallets you've collected. Remember safety first!

    Foundation and Flooring

    Start with a solid foundation. This could be as simple as a level gravel base or more robust concrete slabs. Once your foundation is set, lay down your plywood or OSB flooring. Make sure it's securely fastened to the foundation and create a frame around the exterior.

    Frame and Walls

    This is where your pallets come in! Carefully inspect each pallet for damage and clean them as needed. You might need to disassemble some pallets to use individual boards for framing or structural elements. Start constructing the walls by stacking and securing your pallets vertically. Use screws to join them together â€" nails might be tempting for speed, but screws offer superior strength and longevity. You may need to add extra support beams or bracing depending on the height and overall structure of your shed.

    Roof Construction

    Roofing is a crucial part of protecting your shed. You'll likely need some extra lumber to create rafters or trusses to support the roofing material. The complexity of this step depends on the roof design you choose â€" a simple gable roof is the easiest option for beginners. Once the frame is complete, install roofing felt or shingles to keep the weather out.

    Door and Finishing Touches

    The door is a significant feature â€" make sure it's sturdy and well-secured. Use strong hinges and a reliable latch. Add a door handle for convenience. After the door is hung and secured, it's time for some finishing touches! Apply a weatherproof sealant to protect the wood from moisture and the elements. Consider painting or staining your shed to add personality and longevity.

    Tips for Success

    Here are a few extra tips that can elevate your pallet shed project:

    • Disassemble carefully: Use caution when taking apart pallets; nails and broken boards can easily cause injuries.
    • Pre-treat your wood: Applying a wood preservative before assembly can help prevent rot and insect damage.
    • Level everything: A level foundation and carefully aligned walls are crucial for a stable and attractive shed.
    • Reinforce as needed: Don't be afraid to add extra support beams or bracing if you feel the structure needs it. It’s better to overbuild than underbuild!
    • Enjoy the process: Building a shed can be hard work, but it’s also incredibly rewarding. Take your time, have fun, and don't be afraid to ask for help when needed.

    Commonly Asked Questions

    Q: Are all pallets safe to use?

    A: No, not all pallets are created equal. Avoid pallets marked with "HT" (heat treated) for pesticides. Those marked with "MB" (methyl bromide) are best avoided completely as methyl bromide is a toxic fumigant.

    Q: How long will a pallet shed last?

    A: With proper construction and maintenance (weatherproofing, repairs as needed), a well-built pallet shed can last for several years. The longevity will depend on the quality of the pallets you use, the climate you live in, and how well you maintain it.

    Q: Can I use pallets with different sizes?

    A: While it's possible, it will make the building process more challenging and might require more creative problem-solving. It's generally easier to use pallets of consistent dimensions.

    Q: Do I need a building permit?

    A: This depends on your local regulations. Check with your local authorities before starting construction to see if a permit is required for the size and type of shed you're building.

    Q: What if I don't have any woodworking experience?

    A: Don't worry! This is a manageable project for beginners. Start small, take your time, and utilize online resources and tutorials. There are countless videos and articles that can guide you through each step of the process.

    Happy building! Remember to always prioritize safety and have fun creating your own unique pallet shed.

    Share:

    Create a Custom Lean-To Shed with These Simple, Affordable Plans

    Create a Custom Lean-To Shed with These Simple, Affordable Plans

    Build Your Dream Lean-To Shed: Simple, Affordable Plans

    Tired of overflowing garages and cluttered yards? A lean-to shed offers a fantastic solution for extra storage without breaking the bank or requiring extensive building skills. This guide provides simple, affordable plans to construct your own custom lean-to, transforming unused space into a practical and attractive addition to your property. Get ready to build!

    Planning Your Lean-To Shed

    Before you grab your tools, careful planning ensures a successful project. First, choose a suitable location. Consider proximity to existing structures (like a house or garage) for easy access and to minimize material costs. Ensure the chosen spot provides a stable, level base and complies with any local building codes or restrictions. Next, determine the dimensions. This depends on your storage needs and available space. A smaller lean-to is quicker and cheaper to build, while a larger one offers more storage. Sketch your design, noting the length, width, and height. Finally, create a materials list, accounting for posts, lumber for the roof and walls, roofing materials, fasteners (nails, screws), and any additional features you want to include (e.g., a door, shelves).

    Gathering Your Materials and Tools

    With your plans finalized, gather your materials. The core components are pressure-treated lumber for posts and framing (to resist rot and insects), plywood or other sheeting for walls and roofing, and your chosen roofing material (metal roofing is durable and affordable, while asphalt shingles are readily available). Consider adding a weatherproof sealant for extra protection. Regarding tools, you'll need basic carpentry tools like a measuring tape, level, saw (circular saw or hand saw), hammer, drill, screwdriver, and possibly a post hole digger, depending on your post installation method. If you plan on using metal roofing, you'll need metal cutting shears.

    Essential Materials List:

    • Pressure-treated lumber (posts, rafters, wall studs)
    • Plywood or other sheeting for walls and roof
    • Roofing material (metal, asphalt shingles, etc.)
    • Fasteners (nails, screws, etc.)
    • Weatherproof sealant
    • Gravel or concrete for base (optional)

    Step-by-Step Construction

    Step 1: Prepare the Base. Level the ground where your lean-to will sit. For added stability, consider creating a gravel or concrete base. This prevents rot and provides a level foundation.

    Step 2: Erect the Posts. Position and securely install your posts. For a simple design, use two posts at each end of the lean-to. You can set them in concrete footings for added durability or use ground anchors if your soil is suitable. Ensure the posts are plumb and level.

    Step 3: Build the Frame. Attach horizontal beams to the top of the posts to form the roof’s support structure. Then, attach rafters to the beams, creating the slope of your roof. For added support, consider adding vertical supports (studs) to the wall frame.

    Step 4: Add Sheeting. Attach plywood or other sheeting to the wall frame. If you want to add a door or window, cut out the appropriate openings at this stage.

    Step 5: Install the Roofing. Lay your chosen roofing material over the rafters, following the manufacturer’s instructions for proper installation and overlap.

    Step 6: Final Touches. Seal any gaps or seams to prevent leaks. Add any finishing touches, such as painting or staining, to protect the wood and enhance its appearance.

    Customize and Enjoy!

    This basic plan provides a solid foundation for your lean-to shed. Feel free to customize it! Add shelves for better organization, install a door for security, or even incorporate windows for added light. Remember to always prioritize safety. Wear appropriate safety gear and follow all manufacturer's instructions. With a little time and effort, you can build a beautiful and functional lean-to shed that perfectly suits your needs and enhances your property.

    Share:

    Create a Multi-Purpose 8x12 Shed with Porch Using These Easy Plans

    Create a Multi-Purpose 8x12 Shed with Porch Using These Easy Plans

    Build Your Dream 8x12 Shed with Porch: Easy Plans for a Multi-Purpose Haven

    Hey there, fellow DIY enthusiasts! Are you dreaming of a spacious, versatile shed that’s more than just a storage space? Something that can handle all your gardening tools, your woodworking hobby, *and* offer a cozy spot to relax with a cup of coffee? Well, you're in luck! This guide walks you through building an 8x12 shed with a porch â€" a true multi-purpose marvel â€" using straightforward plans that even a beginner can tackle. Let's get started!

    Planning Your 8x12 Shed with Porch

    Before you grab your hammer, let's map out the details. This isn't just about throwing together some wood; it's about creating a structure you'll love for years to come. This section will guide you through the essential planning stages.

    Choosing Your Location

    Picking the perfect spot is crucial. Consider:

    • Accessibility: Will you need a vehicle to access your shed? Ensure easy access for deliveries and moving heavier items.
    • Sunlight: How much sun exposure do you want? Too much sun can overheat the shed, while too little can make it damp.
    • Drainage: Make sure the ground slopes away from the shed to prevent water accumulation and potential foundation issues.
    • Local Regulations: Check with your local council regarding building permits and setbacks from property lines.

    Material Selection

    The materials you choose heavily influence the shed’s durability and overall look. Let's discuss some popular options:

    • Pressure-Treated Lumber: A great choice for the foundation and framing, offering excellent resistance to rot and insects.
    • Plywood Sheathing: Provides a strong, stable surface for siding and roofing.
    • Siding: Choose from vinyl, wood, metal, or composite materials based on your budget and aesthetic preferences. Vinyl is low-maintenance, while wood offers a classic look.
    • Roofing: Asphalt shingles are a popular and affordable option, offering good protection from the elements. Metal roofing is durable and long-lasting but can be more expensive.

    Foundation & Framing: The Sturdy Backbone

    Building a solid foundation and framing is paramount for a stable and long-lasting shed. Let’s tackle these crucial steps:

    Laying the Foundation

    For an 8x12 shed, a concrete slab is ideal, offering a level and durable base. Alternatively, you can opt for a gravel base, which is simpler but less durable. Regardless of your choice, ensure the ground is level before beginning.

    Framing the Walls and Roof

    This step involves constructing the walls and roof framework using pressure-treated lumber. Accurate measurements and careful assembly are vital here. You'll need to create wall frames, roof trusses (or rafters), and connect them all securely. Pre-drilling holes before driving in screws prevents splitting the wood and makes the job much easier.

    Adding the Porch: Your Outdoor Oasis

    Let's create that inviting porch! This adds character and extends your usable space.

    Porch Framing & Support

    The porch requires its own framing structure, connected to the main shed. Use pressure-treated lumber for the porch base and supports to ensure durability. Make sure the porch's height and depth align with your design and local regulations. You'll want sturdy posts and beams to support the roof structure.

    Porch Roofing & Flooring

    Extend the roofline of the shed to cover the porch, providing shade and protection from the elements. You can use the same roofing material as the shed for a cohesive look. For the flooring, consider using pressure-treated decking or composite materials â€" both are durable and weather-resistant.

    Sheathing, Siding, and Roofing: The Finishing Touches

    With the structure in place, let's add the finishing touches that transform your shed from a framework to a stunning structure.

    Applying Sheathing

    Attach plywood sheathing to the exterior walls and roof, creating a solid base for your siding and roofing materials. Ensure the sheathing is properly fastened to prevent sagging and movement.

    Installing Siding and Roofing

    Now comes the fun part â€" choosing and installing your siding and roofing! Carefully follow the manufacturer's instructions for each material. Take your time and ensure everything is neatly aligned for a professional finish.

    Doors and Windows: Adding Functionality and Light

    Adding doors and windows enhances functionality and aesthetics.

    Choosing the Right Doors and Windows

    Select doors and windows that suit your needs and complement your shed's style. Consider energy-efficient options for better insulation and reduced energy costs.

    Installing Doors and Windows

    Precise measurements are essential for a proper fit. Use quality weather stripping to ensure a tight seal against drafts and leaks.

    Finishing Touches: Adding the Personal Flair

    The final step is making the shed your own! Consider adding:

    • Painting or Staining: Protect the wood and add a touch of personality.
    • Lighting: Install interior and exterior lighting for safety and convenience.
    • Shelving and Workbenches: Maximize storage and workspace.
    • Electrical Outlets: Consider adding power outlets for tools and appliances (remember to consult an electrician).

    Commonly Asked Questions

    Let’s address some frequently asked questions:

    • Q: Do I need a building permit? A: This depends on your local regulations. Check with your local authorities to be sure.
    • Q: How long does it take to build? A: The time varies depending on experience and weather conditions. Expect to spend several weekends, at minimum.
    • Q: How much does it cost? A: The cost depends heavily on materials and finishes. Budget accordingly.
    • Q: Can I build this alone? A: While possible, having a helper is recommended for lifting and assembling heavier components.
    • Q: What tools do I need? A: You'll need basic carpentry tools like saws, hammers, drills, levels, and measuring tapes. Specific tools may vary depending on materials chosen.

    Building your own 8x12 shed with a porch is a rewarding project! With careful planning, patience, and the right approach, you’ll create a multi-purpose haven that perfectly blends practicality and style. Happy building!

    Share:

    Practical 8x12 Lean-To Storage Shed Plans for Gardeners and DIYers

    Practical 8x12 Lean-To Storage Shed Plans for Gardeners and DIYers

    Practical 8x12 Lean-To Storage Shed Plans for Gardeners and DIYers

    Tired of overflowing garages and cluttered garden spaces? An 8x12 lean-to shed offers the perfect solution for gardeners and DIY enthusiasts alike. This versatile structure provides ample storage for tools, equipment, and seasonal items, while blending seamlessly with existing buildings. This guide provides detailed plans, emphasizing practicality and ease of construction for the ambitious DIYer.

    Planning Your 8x12 Lean-To Shed

    Before breaking ground, meticulous planning is crucial. Start by identifying the ideal location. Choose a spot close to your house or garden for easy access, ensuring adequate sunlight and proper drainage. Next, check local building codes and obtain any necessary permits. Remember to consider the weight of the shed and its contents when choosing a foundation. A concrete slab provides the most stable base, but gravel pads or pressure-treated lumber are also viable options depending on your budget and soil conditions. This phase involves careful measurements, detailed sketches, and a comprehensive materials list. Don't skimp on this step; thorough planning prevents costly mistakes down the line.

    Choosing the Right Materials

    Selecting high-quality materials is paramount for longevity and structural integrity. Pressure-treated lumber forms the ideal foundation for a durable shed, resisting rot and insect damage. Consider using thicker lumber for framing, especially in areas prone to high winds or snow loads. For the roof, asphalt shingles offer a cost-effective and weather-resistant solution. Ensure you have enough screws, nails, and other fasteners, opting for galvanized steel for increased durability. A quality sealant will protect the wood from moisture and extend the life of your shed.

    Step-by-Step Construction Guide

    Building your 8x12 lean-to shed is a rewarding process, breaking down into manageable steps. Begin by preparing the foundation, ensuring it’s level and adequately sized. Then, erect the frame, following your carefully crafted plans. Precise cuts and accurate measurements are essential here. Pay close attention to squareness and plumbness to ensure a structurally sound shed. Once the frame is complete, add the sheathing, creating a solid base for your roofing material. Finally, install the roof, ensuring proper overlap of the shingles to prevent leaks. Remember to consult a building guide for more detailed instructions.

    Essential Tools and Equipment

    Gather your tools before you begin! You'll need a variety of equipment including:

    • Measuring tape and level
    • Circular saw and reciprocating saw
    • Drill and driver with various drill bits
    • Hammer and nail gun
    • Shovel and post hole digger (if required)
    • Safety glasses and work gloves

    Adding Finishing Touches

    Once the structural work is complete, you can personalize your shed. Adding a door and windows enhances both accessibility and aesthetics. Consider installing shelves for organized storage or a workbench for DIY projects. A coat of exterior paint or stain will not only enhance its appearance, but also protect the wood from the elements. Don't forget about proper ventilation to prevent moisture buildup. A well-designed lean-to shed becomes a valuable asset to any gardener or DIY enthusiast.

    Tips for Success

    Remember these tips for a successful build:

    • Work with a buddy: Having an extra pair of hands makes the job easier and safer.
    • Take breaks: Avoid burnout by taking regular breaks throughout the construction process.
    • Check your work regularly: Ensure everything is square and plumb at each stage.
    • Celebrate your accomplishment: Enjoy the satisfaction of building your own shed!

    Share:

    How to Build an 8x12 Shed: Step-by-Step Plans and Materials List

    How to Build an 8x12 Shed: Step-by-Step Plans and Materials List

    Building Your Dream 8x12 Shed: A Comprehensive Guide

    Constructing your own shed is a rewarding project that blends practicality with pride of ownership. This guide provides a detailed, step-by-step approach to building an 8x12 shed, empowering you to create a sturdy and functional space for storage or even a workshop. We'll walk you through the entire process, from planning and acquiring materials to the final touches.

    Phase 1: Planning and Preparation

    Before you even touch a tool, thorough planning is essential. This phase sets the foundation for a successful build. Begin by obtaining the necessary permits from your local authorities. These regulations vary by location, so confirming compliance early prevents potential delays. Next, carefully choose your shed's location. Consider factors like accessibility, proximity to utilities, and ground conditions. Level ground is crucial for a stable structure; you might need to level the area using gravel or compacted soil. Finally, finalize your shed's design. Decide on the door placement, window placement (if desired), and any additional features like shelving or electrical outlets.

    Material Selection and Quantity

    Choosing the right materials significantly impacts the shed's durability and longevity. For the frame, pressure-treated lumber is recommended for its resistance to rot and insect damage. Determine the quantities needed based on your design, using a detailed materials list (provided below). Consider using pre-cut lumber to simplify the construction process. For roofing, asphalt shingles offer a balance of cost and durability. Other options include metal roofing or rubber roofing, depending on your budget and aesthetic preferences. Lastly, source concrete for your foundation or select pressure-treated lumber for a less permanent foundation.

    Phase 2: Foundation and Framing

    A solid foundation is paramount for a stable shed. For a permanent solution, pour a concrete slab according to your local building codes. This involves excavating, adding gravel for drainage, and pouring a level concrete base. Alternatively, a less permanent yet effective option is to construct a pier and beam foundation using pressure-treated lumber. This involves setting concrete piers in the ground, creating a level frame upon which you'll build the shed. Once the foundation is complete, begin framing the shed's walls. Carefully measure and cut the lumber according to your plans, ensuring square corners and plumb walls. Use appropriate fasteners, such as galvanized nails or screws, for maximum strength and durability.

    Wall Assembly and Roof Construction

    Assemble the wall sections on the ground, making sure to properly align and secure the studs. This pre-assembly method significantly simplifies the lifting process. Once the walls are complete, erect them onto the foundation, ensuring they are plumb and square. Brace the walls temporarily until the roof is attached. Then, construct the roof trusses according to your design. These trusses, pre-fabricated or built on site, provide essential structural support. Raise and secure the trusses to the top plates of the walls, making sure the roof is properly sloped for water runoff. Finally, install the sheathing, typically plywood, ensuring a solid, weatherproof surface for your roofing material.

    Phase 3: Roofing, Siding, and Finishing

    Once the roof sheathing is installed, it's time to apply your chosen roofing material. Follow the manufacturer's instructions carefully, ensuring proper overlap and nailing patterns for optimal weather protection. Next, install your chosen siding. Vinyl siding is a popular choice for its low maintenance and aesthetic appeal. Alternatively, consider using wood or metal siding, selecting materials that suit your budget and desired look. After siding installation, carefully install the doors and windows, ensuring proper sealing and weather-stripping for energy efficiency.

    Final Touches and Inspection

    The final steps involve adding finishing touches such as trim, painting, or staining. These aesthetic enhancements not only improve the shed's appearance but also offer additional weather protection. Once complete, inspect your shed thoroughly, ensuring all components are properly secured and functioning correctly. Remember to check for any potential leaks or gaps, addressing any issues before they become problems. Celebrate your accomplishment!

    Materials List (Approximate Quantities)

    • Pressure-treated lumber: Various sizes for framing, floor joists, and foundation (if applicable)
    • Plywood: For sheathing and subflooring
    • Roofing material: Asphalt shingles, metal roofing, or other chosen option
    • Siding: Vinyl, wood, or metal siding
    • Doors and windows: Choose size and style to suit your needs
    • Fasteners: Nails, screws, and construction adhesive
    • Concrete (if using concrete foundation): Calculate amount needed based on your slab dimensions.
    • Paint or stain (optional): For exterior finishing

    Disclaimer: This guide provides general instructions. Always consult local building codes and seek professional advice when necessary. Adjust material quantities based on your specific design and chosen materials.

    Share:

    Maximize Your Yard’s Potential with These 8x12 Lean-To Shed Plans

    Maximize Your Yard’s Potential with These 8x12 Lean-To Shed Plans

    Maximize Your Yard’s Potential with These 8x12 Lean-To Shed Plans

    Hey there, fellow backyard enthusiasts! So you're thinking about building a shed, huh? Fantastic! A shed is more than just storage; it's an extension of your living space, a place for your projects, and a serious boost to your property's value. And if you're considering an 8x12 lean-to shed, you're in for a treat. This size offers a great balance of space and practicality, perfect for a wide variety of uses. Let's dive into everything you need to know to make this project a reality!

    Why Choose an 8x12 Lean-To Shed?

    Before we jump into the specifics, let's talk about why an 8x12 lean-to shed is such a popular choice. First off, the dimensions are just right for most yards. It's not too big or too small â€" it's Goldilocks-approved! Secondly, the lean-to design is incredibly versatile. Because it's attached to an existing structure (like your house or garage), you save on materials and potentially simplify the building process. Think of all the possibilities:

    • Extra Storage: Lawn equipment, gardening supplies, holiday decorations â€" you name it, it can fit in here.
    • Workshop Space: Perfect for woodworking, painting, or any other hobby that requires a dedicated workspace.
    • Outdoor Kitchen Prep Area: Imagine a covered space for grilling prep, keeping your food and supplies protected from the elements.
    • Pet Shelter: Create a cozy and protected space for your furry friends.
    • Gardening Haven: Store potting soil, tools, and even start seedlings in a controlled environment.

    The possibilities really are endless! The best part? You'll be able to customize it to perfectly fit your needs.

    Planning Your 8x12 Lean-To Shed: The Essentials

    Now, let's get down to the nitty-gritty. Building anything requires a plan, and your lean-to shed is no exception. Here's what you need to consider before you even pick up a hammer:

    Location, Location, Location!

    This is crucial. Consider these factors:

    • Proximity to your house or existing structure: The lean-to needs a solid anchor point.
    • Accessibility: You'll need easy access for deliveries and future maintenance.
    • Sunlight and shade: Think about how much sun exposure you want.
    • Local regulations: Check your local building codes and zoning regulations before you start.

    Materials Selection: Building Blocks to Success

    Choosing the right materials is essential for the longevity and stability of your shed. Consider these options:

    • Framing: Pressure-treated lumber is a must for durability and resistance to rot.
    • Roofing: Asphalt shingles are a cost-effective and readily available option. Consider metal roofing for added durability.
    • Siding: Vinyl siding is low-maintenance and comes in a variety of colors. Wood siding offers a more rustic look.
    • Foundation: A concrete slab provides a solid base, but gravel or compacted earth can also work depending on your needs and local conditions.

    Tools You'll Need: Getting Equipped

    Before you begin, make sure you have the right tools. This will make the building process much smoother. You'll likely need:

    • Measuring tape
    • Level
    • Saw (circular saw and hand saw recommended)
    • Hammer
    • Drill
    • Screwdriver bits
    • Shovel (if you're doing a concrete foundation)
    • Safety Glasses and Gloves

    This isn't an exhaustive list but covers the basics. You might need additional tools depending on the specific materials you choose.

    Building Your 8x12 Lean-To Shed: Step-by-Step (Simplified)

    I can’t provide a complete, detailed construction guide here because building codes vary and safety is paramount. However, I can give you a general overview of the process:

    1. Prepare the foundation: Level the ground and build your chosen foundation (concrete, gravel, etc.).
    2. Frame the base: Construct the base frame using pressure-treated lumber, ensuring it's square and level.
    3. Erect the walls: Build and attach the wall frames to the base frame.
    4. Install the roof supports: This is where the lean-to design comes in; the roof will rest against the existing structure.
    5. Install the roofing: Attach your chosen roofing material (shingles, metal, etc.).
    6. Add siding: Cover the walls with your chosen siding material.
    7. Install doors and windows (if needed): Cut openings and install your chosen doors and windows.
    8. Finish and Inspect: Check all connections and make any necessary adjustments. Add trim and other finishing touches.

    Remember, safety first! Always wear appropriate safety gear, follow all building codes, and consult with a professional if you're unsure about any aspect of the process. There are tons of excellent online resources and videos that can guide you through each step in more detail.

    Beyond the Basics: Customizing Your Shed

    Once you have the basic structure up, the fun begins! Consider adding these features to truly personalize your 8x12 lean-to:

    • Windows: Add natural light and ventilation.
    • Shelving: Maximize storage space.
    • Workbenches: Create a dedicated workspace.
    • Electrical outlets: Add power for tools and lighting.
    • Insulation: If you plan to use the shed in colder climates, insulation is a great addition.

    Frequently Asked Questions

    Here are some common questions I get about building 8x12 lean-to sheds:

    Q: Do I need a building permit?

    A: Yes, in almost all cases you will need a building permit. Check with your local building department before you start.

    Q: How much will this cost?

    A: The cost will vary greatly depending on the materials you choose, your location, and any additional features you add. Expect to spend anywhere from a few hundred to a few thousand dollars.

    Q: How long will it take to build?

    A: The building time will depend on your experience and the complexity of the project. With some experience, you could potentially build it in a weekend, but plan for more time if you're a beginner.

    Q: Can I build this myself, or do I need professional help?

    A: While it is possible to build this yourself, particularly if you're handy, it's important to assess your skills and comfort level. If you're unsure about any aspect of the process, don't hesitate to hire a professional.

    Q: What about snow load?

    A: Consider your local snow load when choosing roofing materials and designing the roof structure. Ensure the structure can handle the weight of snow accumulation in your area.

    Building your own 8x12 lean-to shed is a rewarding experience. With careful planning and execution, you'll have a fantastic addition to your property for years to come. Good luck, and happy building!

    Share:

    How to Build an 8x12 Lean-To Storage Shed for Storing Tools and Gear

    How to Build an 8x12 Lean-To Storage Shed for Storing Tools and Gear

    Building Your Own 8x12 Lean-To Storage Shed: A DIY Guide

    Hey there, fellow DIY enthusiasts! So you're thinking about building your own storage shed, huh? Smart move! Nothing beats the satisfaction of building something yourself, and an 8x12 lean-to shed is a fantastic project for a weekend warrior (or maybe a few weekends, depending on your pace). This guide will walk you through the entire process, from planning to the final touches. Let's get started!

    Phase 1: Planning and Preparation

    Before you even think about touching a tool, you need a solid plan. This isn't just about throwing some wood together â€" we're building something that's going to last!

    Choosing Your Location

    This is crucial. Consider these factors:

    • Proximity to your house: A lean-to needs to be attached to an existing structure for support. How far is the closest wall suitable for attaching the shed? You'll need easy access, but not so close that it impacts your house's appearance or value.
    • Sunlight and shade: Think about the amount of sun the area gets. Too much sun can damage your stored items, while too little can lead to moisture problems. A balance is ideal.
    • Ground conditions: Is the ground level and stable? You might need to do some leveling before you begin building.
    • Drainage: Make sure the area has good drainage to prevent water from accumulating around the shed.

    Gathering Your Materials

    This is where a detailed materials list comes in handy. I recommend making a list and checking it twice at your local home improvement store, as prices can fluctuate.

    You'll need (approximate quantities; adjust based on your specific design):

    • Pressure-treated lumber for the foundation and framing (4x4 posts, 2x4s, 2x6s)
    • Plywood or OSB for sheathing
    • Roofing materials (shingles, metal roofing, etc.)
    • Exterior siding (vinyl, wood, metal)
    • Nails, screws, and other fasteners
    • Concrete for the foundation (optional, but recommended)
    • Door and window materials (optional)
    • Paint or stain (optional)

    Obtaining Necessary Permits

    Check with your local building department about necessary permits. Depending on your location and the size of your shed, you may or may not need one. It's better to be safe than sorry â€" an unpermitted structure could lead to fines or even demolition.

    Phase 2: Construction

    Now for the fun part! Remember safety first! Always wear safety glasses and appropriate work gloves.

    Foundation

    A solid foundation is key. You have a few options:

    • Concrete slab: This is the most durable option, but it requires more work. You'll need to excavate, pour concrete, and let it cure completely before building on top.
    • Gravel base: A simpler and less expensive option, but it's less durable than concrete. You'll need to create a level base of compacted gravel.
    • Pier blocks: These are concrete blocks that provide a stable base for your frame. They are a good middle ground between a slab and gravel.

    Framing the Walls and Roof

    This is where your carpentry skills come into play. Follow your chosen plans carefully. Ensure the walls are plumb (perfectly vertical) and the roof rafters are properly spaced and secured. Remember, accurate measurements are vital for a stable structure. Using a level and measuring tape repeatedly is key.

    Sheathing and Siding

    Once the framing is complete, you'll attach the plywood or OSB sheathing to the walls and roof. This provides a solid surface for the siding and roofing materials. Make sure your sheathing is properly nailed or screwed down to prevent movement and water damage. Then, you can install your chosen siding. Remember to leave gaps for ventilation if needed.

    Roofing

    Roofing can be tricky, depending on the material you choose. Shingles are relatively easy to install, but metal roofing requires more experience. Follow the manufacturer's instructions carefully. Ensure your roof is properly sealed to prevent leaks. A properly sealed roof will save you headaches later on.

    Finishing Touches

    Once the main structure is complete, you can add finishing touches such as a door, windows, and paint or stain. If you’re adding a door, make sure the frame is perfectly square and plumb. This is your chance to personalize your shed and make it your own! A well-chosen paint color can really make it pop!

    Phase 3: The Finishing Touches and Beyond

    Congratulations! You've built your own 8x12 lean-to storage shed! But there are a few extra steps to consider:

    • Clean up: Dispose of all construction debris properly.
    • Organization: Plan how you'll organize your tools and gear inside. Shelving units are a great investment.
    • Security: Consider adding a padlock to the door for security.
    • Maintenance: Regularly inspect your shed for any damage or signs of wear and tear. A little preventative maintenance goes a long way.

    Frequently Asked Questions

    Here are some questions I often get about building lean-to sheds:

    How long does it take to build an 8x12 lean-to shed?

    This depends on your experience and how much time you can dedicate to the project. A skilled builder might complete it in a long weekend, while a beginner might need several weekends.

    How much does it cost to build an 8x12 lean-to shed?

    Costs vary greatly depending on the materials you choose. You can expect to spend anywhere from $500 to $2000 or more.

    Do I need any special tools?

    You'll need basic carpentry tools such as a hammer, saw, drill, level, measuring tape, and safety glasses. More specialized tools might be needed depending on your chosen materials and construction methods.

    Can I build a lean-to shed without any experience?

    It's possible, but it will be more challenging. Plenty of online resources and tutorials can help you learn the basics. Consider starting with a smaller project to gain experience before tackling something as large as an 8x12 shed.

    Remember, building a shed is a rewarding experience. Take your time, plan carefully, and don't be afraid to ask for help if you need it. Happy building!

    Share:

    Comprehensive Materials List for 6x8 Shed Building Projects

    Comprehensive Materials List for 6x8 Shed Building Projects

    Building Your 6x8 Shed: A Comprehensive Materials List

    Constructing a 6x8 shed is a rewarding DIY project, offering ample storage space while enhancing your property’s aesthetic appeal. However, success hinges on meticulous planning and procuring the right materials. This comprehensive guide breaks down the necessary components, ensuring you’re fully prepared before breaking ground. We'll explore each category in detail, offering suggestions and considerations to guide your purchasing decisions.

    Foundation Materials

    The foundation forms the bedrock of your shed, ensuring stability and longevity. Several options exist, each with its own material requirements. For a concrete slab foundation, you'll need cement, gravel, sand, and rebar. Calculate the necessary quantities based on the shed's dimensions and desired slab thickness. Remember to factor in additional material for potential waste or unforeseen circumstances. Alternatively, consider a simpler gravel base, requiring only a generous amount of compacted gravel to provide a level surface. Finally, pressure-treated lumber forms a solid base for those seeking a quick and straightforward solution. Choose 4x4 pressure-treated lumber for your base supports, ensuring they're properly spaced and leveled.

    Framing Lumber

    The framing provides the structural integrity of your shed. You'll need a mix of lumber sizes, each serving a specific purpose. For the floor joists, opt for 2x6 pressure-treated lumber, spaced appropriately to support the shed's weight. The wall studs, typically 2x4 pressure-treated lumber, require careful measurement and cutting for precise alignment. Remember to consider the door and window openings when planning stud placement. For the roof trusses or rafters, 2x4 or 2x6 lumber (depending on your roof design) will provide the necessary support. Always prioritize lumber that is straight and free from significant knots or defects to ensure structural soundness.

    Specific Lumber Quantities (Approximate):

    These are estimates and may vary depending on your design and construction techniques. Always overestimate slightly.

    • Floor Joists: 10-12 pieces of 2x6 x 8ft
    • Wall Studs: 20-24 pieces of 2x4 x 8ft
    • Roof Rafters/Trusses: 8-10 pieces of 2x4/2x6 x 8-10ft (depending on design)
    • Plates (Top and Bottom): Several pieces of 2x4 lumber, depending on design

    Roofing Materials

    Choosing the right roofing material impacts both the shed's appearance and its durability. Asphalt shingles offer a cost-effective and relatively easy-to-install option, providing decent protection against the elements. For a longer-lasting solution, consider metal roofing, known for its resilience and longevity, though it tends to be pricier. Regardless of your choice, remember to factor in underlayment for added protection against leaks and moisture. Don't forget the necessary roofing nails and any flashing required around chimneys or vents (if applicable).

    Siding and Trim

    The siding not only protects your shed but also contributes to its aesthetic appeal. Vinyl siding is a popular choice due to its low maintenance and variety of colors. Wood siding offers a more rustic look but demands regular maintenance to prevent rot and insect damage. Consider the climate and your personal preferences when making your selection. Remember to purchase sufficient trim boards to finish the edges and corners, enhancing the overall appearance of your shed.

    Doors and Windows

    Choose a shed door that meets your needs in terms of size and functionality. A standard single door might suffice, or you might prefer a double door for easier access to larger items. Pre-hung doors simplify installation, while custom-built doors offer greater flexibility in design. If you opt for windows, select shed-sized windows that suit your preferences and budget. Consider the placement of windows for optimal ventilation and natural light. Remember to acquire the necessary hardware, including hinges, handles, and latches.

    Fasteners and Additional Materials

    Don't overlook the small but essential details. You'll need a variety of nails, screws, and bolts in various sizes to assemble the shed. Construction adhesive can enhance the stability and weather resistance of your project. A level, measuring tape, saw, hammer, and screwdriver are crucial tools for construction. Consider adding weatherstripping for better insulation and sealing, protecting your belongings from the elements. Lastly, remember paint or stain if you plan on finishing the exterior of your shed. Thorough preparation ensures a successful and enjoyable building experience.

    Share:

    How to Build a 6x8 Shed: Free PDF Plans for Beginners

    How to Build a 6x8 Shed: Free PDF Plans for Beginners

    Constructing a 6x8 Shed: A Comprehensive Guide for Beginners

    This comprehensive guide provides a detailed walkthrough for constructing a 6x8 shed, specifically tailored for beginners with limited construction experience. While free PDF plans are readily available online, this guide emphasizes understanding the fundamental principles and techniques involved in each stage of the process. Careful planning and meticulous execution are key to achieving a structurally sound and aesthetically pleasing shed.

    Phase 1: Planning and Preparation

    Before commencing construction, thorough planning is paramount. This phase involves several crucial steps that lay the foundation for a successful project.

    1.1 Site Selection and Preparation

    Site selection is crucial. Choose a level, well-drained area that is easily accessible for material delivery and future maintenance. Ensure the chosen location complies with local building codes and regulations regarding setbacks from property lines and other structures. Site preparation involves clearing vegetation, leveling the ground, and potentially compacting the soil to provide a stable base for the shed's foundation.

    1.2 Material Acquisition and Checklist

    Creating a detailed materials list is essential to avoid delays. This list should include:

    • Pressure-treated lumber for the foundation, framing, and roofing.
    • Concrete mix for the foundation (or alternative foundation materials as per plan).
    • Roofing materials (shingles, felt paper, etc.).
    • Siding materials (e.g., plywood, vinyl, metal).
    • Doors and windows (size and style to match your plan).
    • Fasteners (nails, screws, bolts).
    • Building permits (if required by local ordinances).
    • Safety equipment (safety glasses, gloves, hearing protection).

    Always purchase materials with a margin of error to account for potential cuts, mistakes, or damage. Verify all materials meet the specifications outlined in your chosen plan.

    1.3 Understanding the Building Plans

    Carefully review the free PDF plans you've selected. Familiarize yourself with the terminology, diagrams, and specifications. If any aspects are unclear, seek clarification from experienced builders or online forums before proceeding. Understanding the plans thoroughly will significantly reduce errors and save time during construction.

    1.4 Obtaining Necessary Permits

    Check with your local building department to determine if building permits are required for a structure of this size. Obtain all necessary permits before commencing any construction to avoid legal complications and potential fines. This step also ensures your shed adheres to local building codes and safety regulations.

    Phase 2: Foundation Construction

    A stable foundation is the cornerstone of a long-lasting shed. The chosen foundation type will depend on your specific needs and the soil conditions of your site. Many free plans suggest a concrete slab foundation for its stability and durability.

    2.1 Preparing the Foundation Area

    Precisely mark the dimensions of the shed's footprint on the prepared ground. Excavate the area to the depth specified in your plans, typically several inches below the frost line to prevent heaving during freezing temperatures. Level the excavated area meticulously, ensuring a perfectly flat base.

    2.2 Pouring the Concrete Slab

    Construct a formwork (wooden frame) around the marked area to contain the concrete. Install rebar or wire mesh within the formwork to reinforce the concrete slab. Follow the instructions on your concrete mix bags, adding water gradually while mixing thoroughly to achieve a consistent consistency. Pour the concrete into the formwork and use a screed to level the surface. Allow the concrete to cure completely, typically several days, before proceeding to the next phase. Consider adding gravel beneath the slab for added drainage.

    2.3 Alternative Foundation Methods

    Other foundation options include concrete piers, pressure-treated lumber skids, or a gravel base. The choice depends on your soil type, budget, and the specific requirements of your chosen plans. Always adhere strictly to the instructions provided in your chosen plans for the chosen foundation method.

    Phase 3: Framing the Shed

    Framing the shed involves constructing the walls, floor, and roof structure. Accuracy is crucial at this stage to ensure structural integrity and a square building.

    3.1 Building the Floor Frame

    If not using a concrete slab, construct a floor frame from pressure-treated lumber according to your plans. Ensure the frame is square and level using a square and level to confirm accurate dimensions. Install the floor joists and subflooring to create a stable base for the walls.

    3.2 Erecting the Walls

    Construct the wall frames using pressure-treated lumber, carefully following the dimensions and specifications in your plans. Use appropriate fasteners, ensuring all joints are secure and properly aligned. Temporarily brace the wall frames to maintain their squareness during assembly.

    3.3 Assembling the Roof Frame

    Construct the roof frame according to your plans. This typically involves creating trusses or rafters, which will support the roofing materials. Ensure the roof frame is properly secured to the wall frames and is adequately braced for stability. The slope of the roof is important for proper water runoff.

    3.4 Squaring and Bracing the Structure

    Regularly check the squareness of the walls and roof frame during construction using a speed square and level. Use temporary bracing to maintain the structure's integrity until the sheathing is installed. Proper bracing is critical to prevent warping and twisting.

    Phase 4: Sheathing, Roofing, and Siding

    This phase involves covering the frame with sheathing, installing the roofing, and adding the exterior siding. These steps protect the structure from the elements and enhance its aesthetic appeal.

    4.1 Installing Sheathing

    Install the sheathing material (typically plywood) to the exterior walls and roof. Ensure the sheathing is properly secured with nails or screws and that the edges are butted tightly. This provides a solid base for the siding and roofing materials.

    4.2 Roofing Installation

    Install roofing felt or underlayment over the sheathing to provide a waterproof barrier. Then, install the chosen roofing material (e.g., asphalt shingles) according to the manufacturer's instructions. Ensure proper overlapping to prevent leaks. Pay close attention to the ridge and valleys of the roof.

    4.3 Applying Siding

    Apply the chosen siding material (e.g., plywood, vinyl, metal) over the sheathing. Follow the manufacturer's instructions for proper installation and ensure proper overlap and sealing to prevent water penetration. This step enhances the aesthetic appeal of your shed and offers additional weather protection.

    Phase 5: Finishing Touches

    The final phase involves adding the finishing touches to complete the shed.

    5.1 Installing Doors and Windows

    Install doors and windows according to the manufacturer's instructions. Ensure proper sealing around the frames to prevent air and water leaks. Use appropriate weatherstripping to improve energy efficiency.

    5.2 Painting or Staining

    Apply paint or stain to protect the wood from weathering and enhance the shed's appearance. Choose a weather-resistant product that is suitable for exterior use. Apply multiple coats for optimal protection.

    5.3 Final Inspection and Cleanup

    Conduct a thorough inspection to ensure all aspects of the construction are completed to your satisfaction and meet the requirements of your chosen plan. Clean up the construction site, removing debris and leftover materials.

    Constructing a 6x8 shed requires careful planning, attention to detail, and adherence to safety procedures. While free PDF plans offer guidance, this detailed guide provides a solid foundation for beginners to embark on this rewarding DIY project. Remember to always prioritize safety and consult with experienced builders if you encounter any difficulties.

    Share:

    8x12 Shed Plans for DIY Builders Looking for Practical Storage

    8x12 Shed Plans for DIY Builders Looking for Practical Storage

    8x12 Shed Plans for DIY Builders Seeking Practical Storage

    So, you're thinking about building your own 8x12 shed? Fantastic! That's a super manageable size for a first-time DIY shed builder, offering a great balance of storage space and buildability. This isn't some intimidating mega-project; we're talking about a practical, functional shed perfect for storing lawn equipment, garden tools, bikes, or even a small workshop. Let's dive into everything you need to know to make this a reality.

    Planning Your 8x12 Shed: More Than Just Nail Guns and Dreams

    Before you even think about buying lumber, we need to lay some serious groundwork. Proper planning is the cornerstone of any successful DIY project, and your shed is no exception. Think of this phase as investing in a stress-free build â€" it's totally worth it!

    Choosing the Right Location

    Where will your shed live? This seemingly simple question requires careful consideration. You need to account for things like:

    • Accessibility: Will you need a vehicle to get close to the shed? How easy will it be to move materials during the building process?
    • Sun Exposure: Consider how much sun the shed will receive. Too much sun can heat up the interior, potentially damaging stored items. Too little sun can mean dampness.
    • Drainage: Make sure the area drains well to prevent water accumulation around the foundation. Nobody wants a soggy shed!
    • Local Regulations: Check with your local building department about permits, setbacks (how far from property lines you can build), and any other regulations.

    Designing Your Shed's Layout

    An 8x12 shed offers some great layout options. Consider what you'll be storing and how you'll access it. Here are a few ideas:

    • Shelving: Maximize vertical space with sturdy shelves for smaller items.
    • Workbenches: If you're planning a small workshop, dedicate a section to a workbench.
    • Hanging Storage: Use hooks and racks for tools and other items that can be hung.
    • Door Placement: Think about the best location for the door, considering ease of access and potential obstructions.

    Gathering Your Materials: The Shopping List

    This is where things get exciting (and potentially expensive)! Let's break down the essential materials. Remember, prices vary by location, so get quotes from several suppliers.

    Lumber

    You'll need pressure-treated lumber for the foundation and floor joists to resist rot and insects. Regular lumber is fine for the walls, roof, and framing. Calculate the quantity based on your plans; a detailed materials list is crucial. Don't underestimate!

    Fasteners

    This includes nails, screws, and possibly bolts. Get a variety of sizes for different tasks. Galvanized fasteners are a good choice for outdoor use.

    Other Materials

    You'll also need things like:

    • Roofing materials: Asphalt shingles are a common and cost-effective choice.
    • Siding: Vinyl, metal, or wood siding are all options; choose based on your budget and aesthetic preferences.
    • Doors and windows: Choose sizes that fit your design and budget.
    • Concrete (for the foundation): Or you might choose a gravel base.
    • Paint or stain (optional): To protect the wood and enhance the shed's appearance.

    Building Your 8x12 Shed: Step-by-Step (Simplified)

    I can't give you a full blueprint here, but let's walk through the general process:

    Foundation

    First, prepare the ground. Level it and create a foundation (concrete or gravel). This is critical for a stable and long-lasting shed.

    Floor Framing

    Build the floor frame using pressure-treated lumber. Ensure it's level and square.

    Wall Framing

    Construct the wall frames individually, ensuring they're plumb (perfectly vertical). Then, attach them to the floor frame.

    Roof Framing

    This can be a bit tricky, depending on your roof design. Many 8x12 sheds use a simple gable roof. Make sure your rafters are properly spaced and secured.

    Sheathing and Roofing

    Add sheathing (plywood or OSB) to the walls and roof. Then, install your chosen roofing material. Carefully follow manufacturer instructions.

    Siding and Finishing

    Install the siding, doors, and windows. Add any trim or finishing touches you desire.

    Tips for a Successful DIY Shed Build

    Here are some extra tips to make your life easier:

    • Take your time: Rushing leads to mistakes. Plan your work carefully.
    • Read instructions carefully: Before starting any step, ensure you understand the instructions completely.
    • Use the right tools: Investing in good quality tools will make the job much easier and safer.
    • Ask for help when needed: Don't be afraid to ask friends or family for assistance with the heavier tasks.
    • Celebrate your accomplishments: Building a shed is a significant accomplishment! Be proud of your hard work.

    Commonly Asked Questions

    Q: Do I need a permit to build an 8x12 shed?

    A: It depends on your local building codes. Check with your local authority before you start.

    Q: How long does it take to build an 8x12 shed?

    A: This varies depending on your experience and the complexity of the design. Expect to spend several weekends, or even longer.

    Q: How much does it cost to build an 8x12 shed?

    A: The cost varies greatly based on materials and finishes. A basic shed can cost anywhere from $1,000 to $5,000 or more.

    Q: Can I find free 8x12 shed plans online?

    A: Yes, many websites offer free shed plans. However, always review them carefully before using them to ensure they're suitable for your needs and experience level.

    Q: What kind of wood should I use?

    A: Pressure-treated lumber for the foundation and floor joists is recommended. For the rest of the structure, standard lumber works well.

    Building your own shed is a rewarding experience. Remember to plan carefully, gather your materials, and take your time. Good luck, and happy building!

    Share:

    Transform Your Yard with 8x6 Wood Shed Plans for Extra Storage

    Transform Your Yard with 8x6 Wood Shed Plans for Extra Storage

    Transform Your Yard with 8x6 Wood Shed Plans for Extra Storage

    The addition of a well-designed storage shed can significantly enhance both the functionality and aesthetic appeal of any property. An 8x6 wood shed, in particular, offers a compelling blend of practicality and space efficiency, ideal for a range of storage needs. This comprehensive guide will explore the intricacies of designing, constructing, and maintaining an 8x6 wood shed, providing detailed insights to empower homeowners in undertaking this rewarding project.

    Planning Your 8x6 Wood Shed Project

    Before commencing construction, meticulous planning is paramount. This phase involves several crucial steps that will lay the foundation for a successful project. Careful consideration of these elements will prevent unforeseen complications and ensure a structurally sound and aesthetically pleasing shed.

    Site Selection and Preparation

    Choosing the appropriate location for your shed is the first critical decision. Factors to consider include proximity to your home for easy access, level ground to simplify the foundation process, and sunlight exposure to minimize moisture buildup. Ensure the chosen site complies with local building codes and regulations regarding setbacks and permits. Once the location is finalized, thorough ground preparation is necessary. This involves clearing the area of vegetation, debris, and rocks, and leveling the ground to create a stable base for the shed’s foundation.

    Foundation Considerations

    The foundation type significantly impacts the shed's longevity and stability. Several options exist, each with its own advantages and disadvantages. A concrete slab provides the most robust and durable foundation, offering excellent resistance to shifting ground and moisture. However, it requires more significant upfront investment and labor. Alternatively, a gravel base offers a more budget-friendly solution, although it is less durable and may require more maintenance over time. Pressure-treated wooden blocks or piers offer a compromise between cost and durability, suitable for well-drained soil conditions. The chosen foundation must support the weight of the shed and its contents without settling or shifting.

    Material Selection and Budgeting

    Selecting high-quality materials is essential to ensure the shed’s longevity and structural integrity. Pressure-treated lumber is strongly recommended for its resistance to rot and insect infestation. The thickness of the lumber should be appropriate for the shed's dimensions and intended use. Consider the aesthetic appeal of different wood types and finishes, selecting materials that complement your existing landscaping. Develop a detailed budget that accounts for all materials, tools, permits, and potential labor costs. Accurate budgeting prevents cost overruns and ensures the project remains financially manageable.

    Obtaining Necessary Permits

    Before beginning any construction, it is crucial to check with your local authorities to determine whether a building permit is required for your 8x6 wood shed. Building codes and regulations vary widely depending on location, and neglecting to obtain the necessary permits can result in fines or even demolition orders. The application process typically involves submitting detailed plans and specifications of your shed’s design.

    Construction of the 8x6 Wood Shed

    The construction process can be divided into distinct phases, each requiring careful attention to detail and adherence to best practices. Utilizing appropriate tools and techniques ensures a safe and efficient construction process. Working with a partner or assistant can greatly expedite the process and make certain tasks easier to manage.

    Framing the Walls and Roof

    The framing forms the structural skeleton of the shed. Accurate measurements and precise cuts are crucial to ensure the walls and roof are square and plumb. Use appropriate fasteners, such as galvanized nails or screws, to securely join the lumber. Constructing the walls and roof separately before assembling them on the foundation simplifies the process and improves accuracy. Consider incorporating bracing to enhance the structural integrity of the frame, especially in areas prone to strong winds or heavy snow.

    Installing the Floor and Roofing

    Once the frame is complete, the floor can be installed. This may involve laying plywood sheets over the prepared foundation, ensuring a level and stable surface. For the roof, choose a suitable roofing material such as asphalt shingles, metal sheeting, or corrugated plastic. Properly installing the roofing ensures adequate protection from the elements, minimizing moisture damage and maintaining the shed's structural integrity. Appropriate flashing around chimneys or other protrusions is vital to prevent water leakage.

    Adding Doors and Windows

    The inclusion of a sturdy door and potentially windows enhances the shed's functionality and aesthetics. Choose a door that fits snugly within the frame and provides adequate security. Consider the style and material of the door, ensuring it complements the overall design of the shed. If incorporating windows, select durable and weather-resistant options that provide ventilation and natural light. Proper sealing around the doors and windows prevents drafts and moisture intrusion.

    Finishing Touches and Exterior Trim

    Adding finishing touches significantly elevates the shed’s aesthetic appeal and protects the wood from the elements. This might involve applying a protective sealant or paint, adding exterior trim, and installing gutters and downspouts to manage rainwater runoff. Choose finishes that are compatible with the type of wood used and that offer protection against UV degradation and moisture damage.

    Maintaining Your 8x6 Wood Shed

    Regular maintenance extends the lifespan of your wood shed and preserves its functionality. This involves routine inspections, cleaning, and preventative measures to protect against damage.

    Regular Inspections

    Periodically inspect the shed for any signs of damage, such as rotting wood, loose fasteners, or leaks. Address any issues promptly to prevent more significant problems from developing. Pay attention to the foundation, walls, roof, and doors, checking for any signs of deterioration or structural weakness.

    Cleaning and Repair

    Keep the shed clean and organized to prevent moisture buildup and pest infestations. Regularly sweep or vacuum the floor and remove any debris or clutter. Repair any damaged wood or replace rotten boards as soon as possible. Repaint or reseal the exterior as needed to maintain the shed’s protection against the elements.

    Pest and Moisture Control

    Wood sheds are susceptible to pest infestation and moisture damage. Implementing preventative measures, such as using pest control products, ensuring proper ventilation, and maintaining good drainage, helps minimize these risks. Regular inspections for signs of pests or moisture damage are essential for early intervention.

    Constructing an 8x6 wood shed is a rewarding project that significantly enhances property value and provides valuable storage space. By following these detailed plans and adhering to best practices, homeowners can successfully build a durable and aesthetically pleasing shed that will serve their needs for years to come. Remember to always prioritize safety and consult with professionals when needed.

    Share:

    Maximize Storage in Tight Spaces with 8x6 Shed Plans

    Maximize Storage in Tight Spaces with 8x6 Shed Plans

    Maximize Storage in Tight Spaces with 8x6 Shed Plans

    An 8x6 shed might seem small, but with clever planning and design, it can become a powerhouse of storage. Don't let its compact size fool you; this space, carefully organized, can hold a surprising amount of gear, tools, and equipment. This article provides practical tips and shed plans to help you transform your 8x6 shed from a cramped clutter zone into a highly efficient storage solution.

    Planning Your 8x6 Shed for Maximum Storage

    Before you even think about building, meticulous planning is crucial. Consider what you'll storeâ€"gardening tools, sports equipment, holiday decorations, or a combination? Sketch a floor plan, noting the dimensions and visualizing the placement of shelves, cabinets, and any other storage solutions. Think vertically! Utilize the wall space to its maximum potential by building shelves that reach the ceiling. Remember to leave adequate walkway space to easily access your stored items, preventing frustration and making the shed truly functional.

    Choosing the Right Materials

    Opt for lightweight yet sturdy materials to keep the shed's structure sound without adding unnecessary weight. Pressure-treated lumber offers excellent durability and resistance to rot and insects, making it an ideal choice for the frame and flooring. For the walls and roof, consider using plywood or composite panels â€" lighter options that still provide great strength.

    Smart Storage Solutions for Your 8x6 Shed

    Maximizing storage in a small space requires ingenuity. Avoid bulky, freestanding units that consume valuable floor space. Instead, focus on wall-mounted solutions and clever space-saving techniques. Think about using:

    • Vertical shelving units: These maximize vertical space, allowing you to store items neatly and efficiently.
    • Wall-mounted pegboards: Perfect for hanging tools, making them readily accessible and easily visible.
    • Overhead storage racks: Utilize the often-unused space near the ceiling for storing less frequently accessed items.
    • Drawer systems: These offer excellent organization and easy access to smaller items. Consider pull-out drawers for easy access to items stored in hard-to-reach locations.
    • Hanging organizers: For hanging tools, gardening gloves, or other small equipment.

    Customizable Shelving

    Don't settle for pre-made shelving; design and build your own to perfectly fit the space and your specific storage needs. Adjust shelf heights to accommodate different items, creating customized compartments for optimal organization. Consider using adjustable shelving brackets for flexibility.

    Sample 8x6 Shed Floor Plan

    Here's a basic floor plan to inspire you: One wall could be entirely dedicated to tall shelving units reaching the ceiling, ideal for storing seasonal items or less frequently used tools. A section of the opposite wall could feature pegboards for smaller tools and a workbench with drawers underneath for increased storage. Leave enough clear floor space for easy movement. Remember, this is just a starting point; adapt it to your own specific needs and preferences.

    Building Your 8x6 Shed: A Step-by-Step Approach

    Note: This section provides a high-level overview. Always consult detailed building plans and relevant building codes before commencing construction. Begin with a solid foundation, ensuring it's level and capable of supporting the shed's weight. Next, erect the frame, carefully measuring and securing each component. Install the walls and roof, using appropriate weatherproofing techniques. Finally, add your shelving, pegboards, and other storage solutions, ensuring secure attachment to the structure. Remember to check local building regulations before you start construction.

    With careful planning and smart storage solutions, your 8x6 shed can become a marvel of efficient storage. It's a testament to the fact that even the smallest space can be maximized for practicality and functionality. Don't underestimate the power of clever design!

    Share: